TS-7180 TWI: Difference between revisions
m (Links auto-updated for 2022 re-branding ( https://github.com/embeddedarm/linux-3.10.17-imx6/blob/619e6bf97479243e9d7b7f6b34ce0ae8558ff1fd/arch/arm/boot/dts/imx6qdl-ts4900-2.dtsi#L196 → https://github.com/embeddedTS/linux-3.10.17-imx6/blob/619e6bf97479243e9d7b7f6b34ce0ae8558ff1fd/arch/arm/boot/dts/imx6qdl-ts4900-2.dtsi#L196 https://github.com/embeddedarm/linux-3.10.17-imx6/blob/619e6bf97479243e9d7b7f6b34ce0ae8558ff1fd/Documentation/i2c/dev-interface → https://github.com/embeddedTS/linux-...) |
(HD1 -> HD12 plus formatting cleanup) |
||
| Line 1: | Line 1: | ||
The i.MX6 supports standard | The i.MX6 supports standard I²C at 100 kHz, or using fast mode for 400 kHz operation. The CPU is connected to two I²C buses on the TS-7180. | ||
I2C1 is internal to the TS-7180 and connects to the onboard Silabs supervisory microcontroller at 100 kHz; and to the onboard [http://www.st.com/en/clocks-and-timers/m41t00s.html ST M41T00S] real-time clock (RTC). | |||
{| class=wikitable | {| class=wikitable | ||
|+ /dev/i2c-0 | |+ /dev/i2c-0 | ||
| Line 15: | Line 15: | ||
|} | |} | ||
The second | The second I²C bus, I2C3, is connected to the onboard FPGA, for communication between it and the CPU. This bus also runs at 400 kHz by default. | ||
{| class=wikitable | {| class=wikitable | ||
|+ /dev/i2c-2 | |+ /dev/i2c-2 | ||
| Line 27: | Line 27: | ||
In addition to the CPU | In addition to the CPU I²C buses, a bit-banged I²C interface is available on the daughter-card interface, using gpio. The following command will instantiate (create a device node for) a new ssd1306 display at I²C address 0x3C: | ||
<source lang=bash> | <source lang=bash> | ||
echo ssd1306 0x3c > /sys/bus/i2c/devices/i2c-4/new_device | echo ssd1306 0x3c > /sys/bus/i2c/devices/i2c-4/new_device | ||
</source> | </source> | ||
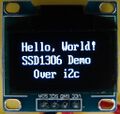
Once this is done, i2c-tools can manipulate the | Once this is done, i2c-tools can manipulate the I²C device, or a the downstream developer can write their own client. Technologic Systems has provided a simple client program for writing to an SSD1306 OLED display connected to the HD12 connector. The photo below shows output on the display. | ||
<gallery> | <gallery> | ||
Image:DSC02626.jpg | Image:DSC02626.jpg | ||
| Line 38: | Line 38: | ||
{{Note|It is also possible to request the kernel to bitbang additional | {{Note|It is also possible to request the kernel to bitbang additional I²C buses as needed. See an example [https://github.com/embeddedTS/linux-3.10.17-imx6/blob/619e6bf97479243e9d7b7f6b34ce0ae8558ff1fd/arch/arm/boot/dts/imx6qdl-ts4900-2.dtsi#L196 here].}} | ||
The kernel makes the | The kernel makes the I²C available at <code>/dev/i2c-#</code>, where "#" is 0, 2, or 4. You can use the i2c-tools (i2cdetect, i2cget, i2cset), or you can [https://github.com/embeddedTS/linux-3.10.17-imx6/blob/619e6bf97479243e9d7b7f6b34ce0ae8558ff1fd/Documentation/i2c/dev-interface write your own client]. | ||
Latest revision as of 11:28, 11 May 2023
The i.MX6 supports standard I²C at 100 kHz, or using fast mode for 400 kHz operation. The CPU is connected to two I²C buses on the TS-7180.
I2C1 is internal to the TS-7180 and connects to the onboard Silabs supervisory microcontroller at 100 kHz; and to the onboard ST M41T00S real-time clock (RTC).
| Address | Device |
|---|---|
| 0x4a | #Silabs |
| 0x68 | #RTC |
The second I²C bus, I2C3, is connected to the onboard FPGA, for communication between it and the CPU. This bus also runs at 400 kHz by default.
| Address | Device |
|---|---|
| 0x28-0x2f | #FPGA |
In addition to the CPU I²C buses, a bit-banged I²C interface is available on the daughter-card interface, using gpio. The following command will instantiate (create a device node for) a new ssd1306 display at I²C address 0x3C:
echo ssd1306 0x3c > /sys/bus/i2c/devices/i2c-4/new_device
Once this is done, i2c-tools can manipulate the I²C device, or a the downstream developer can write their own client. Technologic Systems has provided a simple client program for writing to an SSD1306 OLED display connected to the HD12 connector. The photo below shows output on the display.
Download the source-code tarball here: File:Ssd1306-demo.tar.gz
| Note: | It is also possible to request the kernel to bitbang additional I²C buses as needed. See an example here. |
The kernel makes the I²C available at /dev/i2c-#, where "#" is 0, 2, or 4. You can use the i2c-tools (i2cdetect, i2cget, i2cset), or you can write your own client.
