TS-8200: Difference between revisions
(Created page with "{{Infobox |title = TS-8200 |image = 200px |titlestyle = |headerstyle = background:#ccf; |labelstyle = width:33% |datastyle = |data1 ...") |
No edit summary |
||
| Line 13: | Line 13: | ||
|data5 = [http://www.embeddedarm.com/documentation/ts-8200-pcb-sources.zip PCB Sources] | |data5 = [http://www.embeddedarm.com/documentation/ts-8200-pcb-sources.zip PCB Sources] | ||
}} | }} | ||
= Overview = | |||
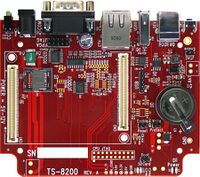
The TS-8200 is a TS-SOCKET Baseboard that provides a test and development platform for Technologic Systems TS-4xxx products. and accepts any TS-4xxx Macrocontroller. The TS-8200 provides industry standard connectors for the various ports and features on many of the TS Macrocontroller products like the TS-4500, TS-4200, etc. It provides transceivers for the RS-232 ports, CAN port, and the RS-485 port, brought out to the male DB9 and .1" pitch header connections. It also has the Ethernet "magnetics", RJ-45 connector, USB Host and Device connectors, Temperature Sensor, MicroSD card socket, Realtime Clock Battery, and two LEDs. Power input requirement is regulated 5.0 to 12.0 VDC. | |||
= Getting Started = | |||
The TS-8200 board has no specific boot sequence since the processor and Linux Operating System are located on the selected TS-4000 Series Macrocontroller. For the rest of the boot and setup procedure, please refer to the manual for the selected TS-4000 series Macrocontroller you are using listed [[Main_Page#TS-Sockets|here]]. | |||
Before attempting to apply power to the TS-8200, perform the following steps while taking proper static discharge precautions | |||
* Place the TS-8200 base board on a firm non-conductive surface. | |||
* Carefully, insert the TS-4000 Series Macrocontroller daughterboard by aligning and pressing evenly and firmly onto the pair of mating connectors | |||
* Connect the console serial terminal cable | |||
* Connect the Ethernet cable is applicable. | |||
* Apply power | |||
* Monitor the TS-SOCKET SBC using a terminal emulator connected to the serial console port to verify that the board is operating properly | |||
* Connect either a regulated 5.0 to 12.0 VDC on the power input connector or the regulated 5.0 VDC via USB Device port. Please note the polarity printed on the board. | |||
Revision as of 15:58, 18 October 2011
 | |
| Released Mar. 2011 | |
| Product Page | |
| Documentation | |
|---|---|
| Schematic | |
| PCB Sources |
Overview
The TS-8200 is a TS-SOCKET Baseboard that provides a test and development platform for Technologic Systems TS-4xxx products. and accepts any TS-4xxx Macrocontroller. The TS-8200 provides industry standard connectors for the various ports and features on many of the TS Macrocontroller products like the TS-4500, TS-4200, etc. It provides transceivers for the RS-232 ports, CAN port, and the RS-485 port, brought out to the male DB9 and .1" pitch header connections. It also has the Ethernet "magnetics", RJ-45 connector, USB Host and Device connectors, Temperature Sensor, MicroSD card socket, Realtime Clock Battery, and two LEDs. Power input requirement is regulated 5.0 to 12.0 VDC.
Getting Started
The TS-8200 board has no specific boot sequence since the processor and Linux Operating System are located on the selected TS-4000 Series Macrocontroller. For the rest of the boot and setup procedure, please refer to the manual for the selected TS-4000 series Macrocontroller you are using listed here.
Before attempting to apply power to the TS-8200, perform the following steps while taking proper static discharge precautions
- Place the TS-8200 base board on a firm non-conductive surface.
- Carefully, insert the TS-4000 Series Macrocontroller daughterboard by aligning and pressing evenly and firmly onto the pair of mating connectors
- Connect the console serial terminal cable
- Connect the Ethernet cable is applicable.
- Apply power
- Monitor the TS-SOCKET SBC using a terminal emulator connected to the serial console port to verify that the board is operating properly
- Connect either a regulated 5.0 to 12.0 VDC on the power input connector or the regulated 5.0 VDC via USB Device port. Please note the polarity printed on the board.