BLE Examples: Difference between revisions
(→Running: Added example photos) |
(→Example Advertisement (BlueZ From Source): Add screenshot for example) |
||
| Line 134: | Line 134: | ||
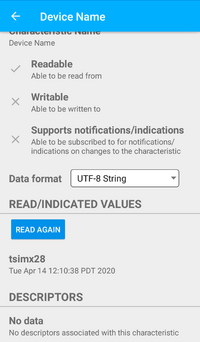
On another BLE compatible device, running a scan will return our device named "TS_BLE_Demo." This device can be connected to, the example will start up a number of simple services. For example, the device name can be read. The following screenshot from a smartphone reads the "Device Name" value. | On another BLE compatible device, running a scan will return our device named "TS_BLE_Demo." This device can be connected to, the example will start up a number of simple services. For example, the device name can be read. The following screenshot from a smartphone reads the "Device Name" value. | ||
[[file:Ble_dev_name.png|200px]] | |||
== Example GATT Server (BlueZ From Source) == | == Example GATT Server (BlueZ From Source) == | ||
Revision as of 14:43, 15 April 2020
Bluetooth Low Energy Examples
Many Technologic Systems' products offer on-board support of WiFi and Bluetooth via a soldered down module. In applications without on-board support, Bluetooth connectivity can still be achieved with a USB dongle.
This document will focus only on products that use the on-board modules. While these examples should work just the same, external USB modules may require additional configuration and support that is not covered here. Additionally, these examples will only cover Bluetooth Low Energy and not Bluetooth Classic modes.
The primary provider of Bluetooth support in Linux is the BlueZ project. Additionally, many distributions provide their own releases of BlueZ packages so they do not need to be built from source.
Below, we have a set of instructions for both installing and using BlueZ with some of our products. Additionally, BlueZ provides a set of example scripts for testing functionality and for use as a starting point for development. The instructions below are split in to two main categories, installing BlueZ from Debian's APT repository, and installing it from source with the current latest available release. The process and locations of these two methods do differ, but ultimately they offer the same usability examples.
Note that only one of the two instruction sets should be followed, i.e. installing from APT or installing from source. Doing both may result in an unstable system with conflicting binary versions.
Note that all of the examples assume the unit is running at least Debian Stretch with at least a 4.9 kernel. Using older distributions or kernels may result in compatibility or functionality issues.
BlueZ from Debian APT
Installing BlueZ From APT
At the time of writing this, Debian Stretch supplies BlueZ 5.43 which should be a new enough version for most applications. Additionally, BlueZ supplies a number of demo scripts that we will be using later to test functionality and demonstrate BLE connectivity.
The full compliment of binaries and utilities can be installed with:
apt-get update && apt-get install -y bluez bluez-test-tools bluez-test-scripts
This will install the example tools to /usr/share/doc/bluez-test-scripts/examples/ which we will use later.
BlueZ From Source
Installing BlueZ From Source
At the time of writing this, version 5.54 is the latest BlueZ release. The following examples will download, build, and install BlueZ directly on the target device. Compilation directly on the device will be far slower but does not have the prerequisite of a properly set up cross build system. Cross compilation of BlueZ is possible, but is beyond the scope of this document.
First, since most of our products ship with BlueZ pre-installed from the distribution package manager, this will need to be removed:
apt-get purge "bluez*"
Ensure all build requirements are met:
apt-get update && apt-get install -y git libglib2.0-dev libglib2.0-0 libdbus-1-dev libdbus-1-3 libudev-dev libudev1 libical-dev libical2 libreadline-dev libreadline7 python3-dbus
Next, download the sources for BlueZ 5.54:
wget https://www.kernel.org/pub/linux/bluetooth/bluez-5.54.tar.xz
tar xvf bluez-5.54.tar.xz
Configure, build, and install BlueZ:
cd bluez-5.54
./configure --enable-library --enable-test --enable-deprecated && make install
systemctl enable bluetooth
From here, the example tools will be installed to /usr/local/lib/bluez/test/. We will be using this later.
Running the Examples (BlueZ From Source)
With BlueZ and its examples built and installed, it's now possible to start running some of the examples and using them for further development. Below, we highlight a few different examples.
Before running any of the examples, the Bluetooth device must be up and enabled. See the specific device's manual's Bluetooth section for information and steps on how to bring up and enable the on-board Bluetooth device.
However! If the manual's instructions use the hciconfig command, do not run this command! The reason is that recent versions of BlueZ have moved to a more centralized control scheme using bluetoothd. Running the hciconfig command in any way can cause the Bluetooth service to enter an invalid state. If needed, the use of hciattach is safe for attaching the device to the kernel.
Once the device has been brought up, bluetoothd can be started:
systemctl start bluetooth
Note that the installation of BlueZ will enable bluetoothd to start on bootup, however it will not start if no devices are attached to the system. Most of our products with on-board Bluetooth modules will require some attachment process that must be run first. If using an external USB device, it is likely that the kernel will recognize and start up the device early on which will allow systemd to automatically start bluetoothd.
Additionally, most of the examples will require a compatible external device, e.g. a smartphone or other peripheral that is able to connect to other BLE nodes.
Discover Devices (BlueZ From Source)
This simple script will scan for and print any nearby BLE devices that are detected by the BLE module on the unit.
Prerequisites
- The Bluetooth device must already be set up via the devices's manual's instructions (without the use of the
hciconfigcommand!) andbluetoothdstarted via system as noted above. - Be running as
rootuser or a user with proper permissions.
Running
The example can be started with:
root@tsimx28:~# /usr/local/lib/bluez/test/test-discovery
[ XX:XX:XX:XX:XX:XX ]
    AddressType = public
    Name = ABC123
    Paired = 0
    ServicesResolved = 0
    Adapter = /org/bluez/hci0
    LegacyPairing = 0
    TxPower = 6
    Alias = ABC123
    Connected = 0
    UUIDs = ...
    RSSI = -48
    Trusted = 0
    Blocked = 0
...
The example will continue to run and print newly discovered devices until Ctrl+c is pressed on the terminal.
Example Advertisement (BlueZ From Source)
In order for a BLE device to be found via a search, it needs to be set up to advertise. This example will create an advertisement with a customized name.
Prerequisites
- The example was tested against a smartphone with BLE capabilities, using a simple BLE monitor tool.
- The Bluetooth device must already be set up via the devices's manual's instructions (without the use of the
hciconfigcommand!) andbluetoothdstarted via system as noted above. - Be running as
rootuser or a user with proper permissions.
Running
Before this is run, we're going to set a custom advertising name to make it more identifiable.
sed -i -e "s/'TestAdvertisement'/'TS_BLE_Demo'/" /usr/local/lib/bluez/test/example-advertisement
Run the example with:
root@tsimx28:~# /usr/local/lib/bluez/test/example-advertisement &
Advertising forever...
GetAll
returning props
Advertisement registered
root@tsimx28:~#
If there are any errors, check that all of the prerequisites have been satisfied.
On another BLE compatible device, running a scan will return our device named "TS_BLE_Demo." This device can be connected to, the example will start up a number of simple services. For example, the device name can be read. The following screenshot from a smartphone reads the "Device Name" value.
Example GATT Server (BlueZ From Source)
The BlueZ example GATT server emulates a dummy device with a dummy battery. It demonstrates being able to do active reads of a BLE device as well as subscribing to push notifications from a device.
Prerequisites
- The example was tested against a smartphone with BLE capabilities, using a simple BLE monitor tool.
- The Bluetooth device must already be set up via the devices's manual's instructions (without the use of the
hciconfigcommand!) andbluetoothdstarted via system as noted above. - Be running as
rootuser or a user with proper permissions. - Set up and run the Example Advertisement (BlueZ From Source) example. This is needed so that the BLE device can be advertised and discovered.
| Note: | Due to caching on some devices, it may be necessary to completely exit any BLE scanning applications/tools, and potentially even power-cycling the BLE device itself on any devices connecting to the example GATT server below. This has been observed to be necessary on at least one specific smartphone that was used to connect to the unit's on-board BLE module running these examples. |
Running
Run the example with:
root@tsimx28:~# /usr/local/lib/bluez/test/example-gatt-server
Registering GATT application...
GetManagedObjects
GATT application registered
root # The following lines will not be printed until the device connects and does a read of the "Battery Level" service
Battery Level read: 100
Battery Level read: 100
Battery Level drained: 98
Battery Level drained: 96
Battery Level drained: 94
...
root # The following lines will not be printed until the device connects and subscribes to the "Heart Rate Measurement" service
Update HR Measurement Simulation
Updating value: [dbus.Byte(14), dbus.Byte(93), dbus.Byte(0), dbus.Byte(0)]
Updating value: [dbus.Byte(6), dbus.Byte(127)]
Updating value: [dbus.Byte(6), dbus.Byte(108)]
Updating value: [dbus.Byte(6), dbus.Byte(128)]
...
root # The following lines will not be printed until the device connects and interacts with the "characteristic for testing" services
TestCharacteristic Write: dbus.Array([dbus.Byte(192), dbus.Byte(255), dbus.Byte(238)], signature=dbus.Signature('y'))
TestSecureCharacteristic Write: dbus.Array([dbus.Byte(222), dbus.Byte(250), dbus.Byte(206)], signature=dbus.Signature('y'))
TestCharacteristic Read: dbus.Array([dbus.Byte(192), dbus.Byte(255), dbus.Byte(238)], signature=dbus.Signature('y'))
TestSecureCharacteristic Read: dbus.Array([dbus.Byte(222), dbus.Byte(250), dbus.Byte(206)], signature=dbus.Signature('y'))
...
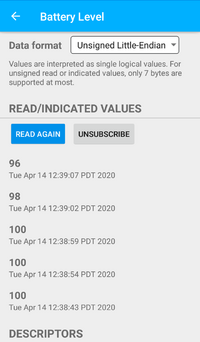
With the connecting device, it is possible to read from or subscribe to the Battery Level service. The running example will print "Battery Level read: ..." each time the battery is manually read. When subscribed to, the connecting device will receive periodic updates of the battery level. When an update goes out, the running example will print "Battery Level drained: ..." with the value also being sent to any subscribed devices. The following screenshot is an example of what a connected device would see.
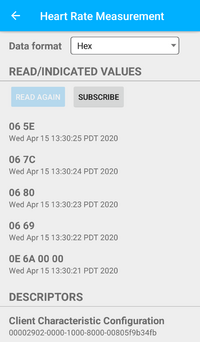
With the connecting device, it is possible to subscribe to the Heart Rate Measurement service. The running example will print simulation values to the terminal once every second, with the same values being sent to any subscribed devices. The following screenshot is an example of what a connected device would see.
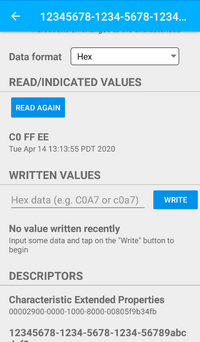
With the connecting device, it is possible to write and read multiple of the characteristic for testing services. Anything that is written to these services can be read back independently. In the example output above, the hex value 0xC0FFEE was written and read back from the first service, while 0xDEFACE was written and read back from the third service.
When done, press Ctrl+c to end the example and return to the command line, leaving the advertising example running in the background still.


