TS-4900 QT5 IDE Setup
| Note: | This guide is intended for our stock image using systemd, but you are using a custom images the directions should apply if you rebuild with your own yocto toolchain (meta-toolchain-qt5), and update the paths if you are using a different distribution. |
Install qtcreator. The version from a recent Linux distribution should be fine. In a debian/Ubuntu desktop, run:
sudo apt-get update && sudo apt-get install qtcreator
You will also need to download the SDK which includes the QT support:
You can install these with:
## i686
sudo sh ./poky-systemd-eglibc-i686-meta-toolchain-qt5-cortexa9hf-vfp-neon-toolchain-1.6.1.sh
# or
## x86_64
sudo sh ./poky-systemd-eglibc-x86_64-meta-toolchain-qt5-cortexa9hf-vfp-neon-toolchain-1.6.1.sh
These instructions assume the path will be default at "/opt/poky-systemd/1.6.1/". Once the SDK is installed, an environment script has to be sourced before launching qtcreator.
source /opt/poky-systemd/1.6.1/environment-setup-cortexa9hf-vfp-neon-poky-linux-gnueabi
qtcreator
| Note: | QtCreator needs to be launched with this sourced every time the cross toolchain is used or it will fail with compile errors. |
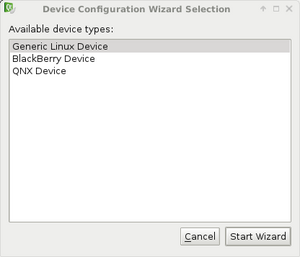
Next we need to configure QT Creator to build using this toolchain. When QT creator launches and go to Tools->Options, and select Devices. Click "Add" and select "Generic Linux Device" and click "Start Wizard".
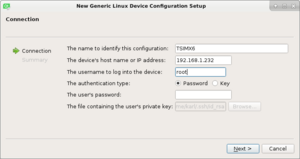
On the next page you will need to specify the ip address or hostname to the system. This could potentially change depending on your network, so if it fails to deploy code later this may need to be updated to point at a new IP for your TS-4900. In this example, my TS-4900 has a dhcp address of 192.168.2.45. The default Yocto image will use "root" with no password to connect. Set the name to "TS-4900" as well.
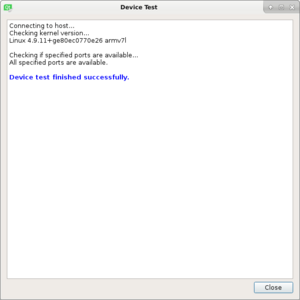
It will then verify connectivity. You can click close and continue.
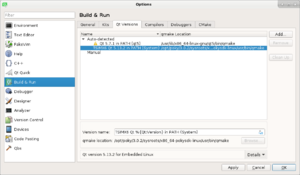
Next, in the left column of the Options menu, select "Build & Run". Start with the "QT Versions" tab, and click "Add" in the upper right to configure the TS-4900. Set Version name to "QT 5.2.1 (TS-4900)".
In our default SDK on x86_64 this is "/opt/poky-systemd/1.6.1/sysroots/x86_64-pokysdk-linux/usr/bin/qt5/qmake". If you're using the x86 toolchain, "/opt/poky-systemd/1.6.1/sysroots/x86-pokysdk-linux/usr/bin/qt5/qmake".
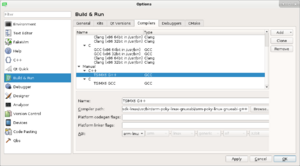
Next go to the "Compilers" tab, and click "Add", and select "GCC". Set the Name to "TS-4900 GCC". For the "Compiler Path":
- i686
- /opt/poky-systemd/1.6.1/sysroots/i686-pokysdk-linux/usr/bin/arm-poky-linux-gnueabi/arm-poky-linux-gnueabi-g++
- x86_64
- /opt/poky-systemd/1.6.1/sysroots/x86_64-pokysdk-linux/usr/bin/arm-poky-linux-gnueabi/arm-poky-linux-gnueabi-g++
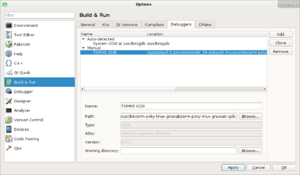
Next, go to the Debuggers tab, and click "Add". For name, specify "TS-4900 GDB". For the paths, specify the location of gdb:
- i686
- "/opt/poky-systemd/1.6.1/sysroots/i686-pokysdk-linux/usr/bin/arm-poky-linux-gnueabi/arm-poky-linux-gnueabi-gdb"
- x86_64
- /opt/poky-systemd/1.6.1/sysroots/x86_64-pokysdk-linux/usr/bin/arm-poky-linux-gnueabi/arm-poky-linux-gnueabi-gdb
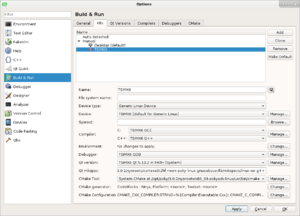
Next, go to the "Kits" tab and click add. For Name, enter "TS-4900". Set device type to "Generic Linux Device". Set the device to "TS-4900 (default for Generic Linux)". Set the sysroot to "/opt/poky-systemd/1.6.1/sysroots/cortexa9hf-vfp-neon-poky-linux-gnueabi". Set the compiler to "TS-4900 GCC". Set Debugger to "TS-4900 GDB". Set the QT version to "Qt 5.2.1 (TS-4900)". Finally, click Apply.
At this point QT Creator is set up to begin your first project.
