TS-7200: Difference between revisions
No edit summary |
No edit summary |
||
| Line 24: | Line 24: | ||
== Get a Console == | == Get a Console == | ||
The default console is available on the DB9 port using the a 115200 baud, 8n1 connection with no flow control. You also must have JP2 in place in order to enable the console out. You can redirect | The default console is available on the DB9 port using the a 115200 baud, 8n1 connection with no flow control. You also must have JP2 in place in order to enable the console out. You can redirect console to COM2 by enabling JP4. | ||
{{:Console from Workstation}} | {{:Console from Workstation}} | ||
You can also telnet to the board with the [[default network configuration]] which will provide telnet. | You can also telnet to the board with the [[default network configuration]] which will provide telnet. | ||
== Jumpers == | |||
{| class="wikitable" | |||
|- | |||
! Jumper | |||
! Description | |||
! Address | |||
! Bit | |||
! Description | |||
|- | |||
| JP1 | |||
| Boot to serial port COM1. | |||
| N/A | |||
| | |||
| | |||
|- | |||
| JP2 | |||
| Enable serial console (COM1 Default) | |||
| 0x1080_000 | |||
| 0 | |||
| On=1 | |||
|- | |||
| JP3 | |||
| Write enable flash. | |||
| 0x1080_000 | |||
| 1 | |||
| On=1 | |||
|- | |||
| JP4 | |||
| Redirects console to COM2 (with JP2 on) | |||
| 0x1080_000 | |||
| 3 | |||
| On=0 | |||
|- | |||
| JP5 | |||
| Enables Testing | |||
| 0x1080_000 | |||
| 4 | |||
| On=0 | |||
|- | |||
| JP6 | |||
| User Configurable | |||
| 0x2280_000 | |||
| 0 | |||
| On=1 | |||
|} | |||
= Backup / Restore = | |||
== Compact Flash == | |||
If backing up on a separate workstation, keep in mind windows does not have direct block device support needed to write these images. You will also need to determine the CF card device. You can usually find this in the output of 'dmesg' after inserting the CF card and you will typically see something like '/dev/sdb' as the block device and '/dev/sdb1' for the first partition. On some newer kernels you will see '/dev/mmcblk0' as the block device and '/dev/mmcblkop1' for the first partition. For these examples I will use the '/dev/mmcblk0' format. | |||
If you are backing up directly on the board you will likely need to use some kind of offboard storage like a thumbdrive or external hard drive. | |||
You can find the latest CF card image [ftp://ftp.embeddedarm.com/ts-arm-sbc/ts-7200-linux/binaries/ts-images/2gbsd-may262011.dd.bz2 here]. Make sure you decompress the image before writing. | |||
'''Backup ''' | |||
Entire SD card | |||
<source lang=bash> | |||
dd if=/dev/mmcblk0 of=/path/to/backup.dd bs=32k | |||
</source> | |||
Kernel | |||
<source lang=bash> | |||
dd if=/dev/mmcblk0p2 of=/path/to/zImage bs=32k | |||
</source> | |||
Initrd | |||
<source lang=bash> | |||
dd if=/dev/mmcblk0p3 of=/path/to/initrd bs=32k | |||
</source> | |||
''' Restore''' | |||
Entire SD card | |||
<source lang=bash> | |||
dd if=/path/to/backup.dd of=/dev/mmcblk0 bs=32k | |||
</source> | |||
Kernel | |||
<source lang=bash> | |||
dd if=/path/to/zImage bs=32k of=/dev/mmcblk0p2 | |||
</source> | |||
Initrd | |||
<source lang=bash> | |||
dd if=/initrd bs=32k of=/dev/mmcblk0p3 | |||
</source> | |||
Revision as of 21:00, 11 August 2011
 | |
| Product Page | |
| Documentation | |
|---|---|
| Schematic | |
| Mechanical Drawing | |
| FTP Path | |
| Cirrus Logic EP9302 | |
| CPU User Guide |
Overview
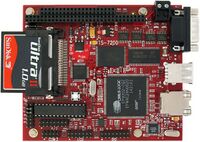
The TS-7200 is a compact, full-featured Single Board Computer (SBC) based upon the Cirrus EP9302 ARM9 CPU, which provides a standard set of on-board peripherals.
Getting Started
A Linux PC is recommended for development. For developers who use Windows, virtualized Linux using VMWare or similar are recommended in order to make the full power of Linux available. The developer will need to be comfortable with Linux anyway in order to work with embedded Linux on the target platform. The main reasons that Linux is useful are:
- Linux filesystems on the microSD card can be accessed on the PC.
- More ARM cross-compilers are available.
- If recovery is needed, a bootable medium can be written.
- A network filesystem can be served.
- Builds such as Linux kernel, buildroot, yocto, distro-seed will not work from WSL1/2 on a case insensitive filesystem.
| WARNING: | Be sure to take appropriate Electrostatic Discharge (ESD) precautions. Disconnect the power source before moving, cabling, or performing any set up procedures. Inappropriate handling may cause damage to the board. |
With the TS-7200 there is a terminal block power connector which is removable to expose 2 pins you can also use to supply power.
Get a Console
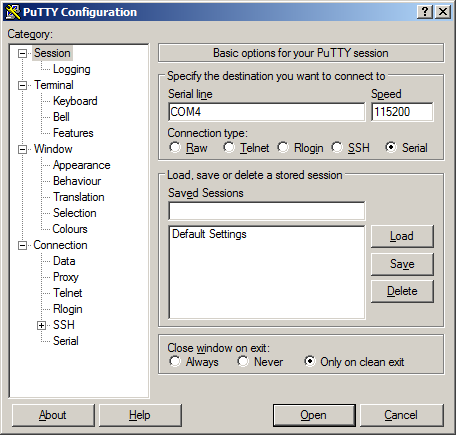
The default console is available on the DB9 port using the a 115200 baud, 8n1 connection with no flow control. You also must have JP2 in place in order to enable the console out. You can redirect console to COM2 by enabling JP4.
Use a null modem cable to connect the ARM system to your workstation. If you do not have a COM port on your system (as many newer systems do not), you can find a USB serial adapter that will bring out RS232.
Console from Linux
There are many serial clients for Linux, but 3 simple ones would be picocom, screen, and minicom. These examples assume that your COM device is /dev/ttyUSB0 (common for USB adapters), but replace them with the COM device on your workstation.
Linux has a few applications capable of connecting to the board over serial. You can use any of these clients that may be installed or available in your workstation's package manager:
Picocom is a very small and simple client.
picocom -b 115200 /dev/ttyUSB0
Screen is a terminal multiplexer which happens to have serial support.
screen /dev/ttyUSB0 115200
Or a very commonly used client is minicom which is quite powerful:
minicom -s
- Navigate to 'serial port setup'
- Type "a" and change location of serial device to '/dev/ttyUSB0' then hit "enter"
- If needed, modify the settings to match this and hit "esc" when done:
     E - Bps/Par/Bits          : 115200 8N1
     F - Hardware Flow Control : No
     G - Software Flow Control : No
- Navigate to 'Save setup as dfl', hit "enter", and then "esc"
Console from Windows
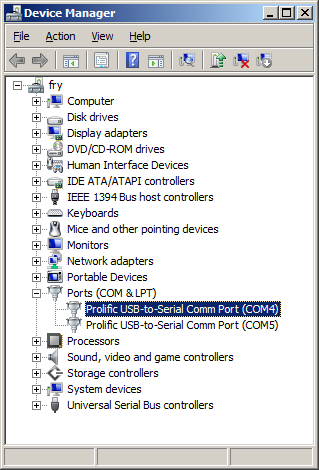
Putty is a small simple client available for download here. Open up Device Manager to determine your console port. See the putty configuration image for more details.
You can also telnet to the board with the default network configuration which will provide telnet.
Jumpers
| Jumper | Description | Address | Bit | Description |
|---|---|---|---|---|
| JP1 | Boot to serial port COM1. | N/A | ||
| JP2 | Enable serial console (COM1 Default) | 0x1080_000 | 0 | On=1 |
| JP3 | Write enable flash. | 0x1080_000 | 1 | On=1 |
| JP4 | Redirects console to COM2 (with JP2 on) | 0x1080_000 | 3 | On=0 |
| JP5 | Enables Testing | 0x1080_000 | 4 | On=0 |
| JP6 | User Configurable | 0x2280_000 | 0 | On=1 |
Backup / Restore
Compact Flash
If backing up on a separate workstation, keep in mind windows does not have direct block device support needed to write these images. You will also need to determine the CF card device. You can usually find this in the output of 'dmesg' after inserting the CF card and you will typically see something like '/dev/sdb' as the block device and '/dev/sdb1' for the first partition. On some newer kernels you will see '/dev/mmcblk0' as the block device and '/dev/mmcblkop1' for the first partition. For these examples I will use the '/dev/mmcblk0' format.
If you are backing up directly on the board you will likely need to use some kind of offboard storage like a thumbdrive or external hard drive.
You can find the latest CF card image here. Make sure you decompress the image before writing.
Backup
Entire SD card
dd if=/dev/mmcblk0 of=/path/to/backup.dd bs=32k
Kernel
dd if=/dev/mmcblk0p2 of=/path/to/zImage bs=32k
Initrd
dd if=/dev/mmcblk0p3 of=/path/to/initrd bs=32k
Restore
Entire SD card
dd if=/path/to/backup.dd of=/dev/mmcblk0 bs=32k
Kernel
dd if=/path/to/zImage bs=32k of=/dev/mmcblk0p2
Initrd
dd if=/initrd bs=32k of=/dev/mmcblk0p3

