TS-7100 getting started
A Linux workstation is recommended and assumed for development using this documentation. For users in Windows or OSX, we recommend virtualizing Linux. Most of our platforms run Debian, which is recommended for ease of use if there is no personal distribution preference.
Virtualization
Suggested Linux Distributions
Development using a Windows or OSX system may be possible but is not supported. Development will include accessing drives formatted for Linux and often Linux-based tools.
Connect USB Console
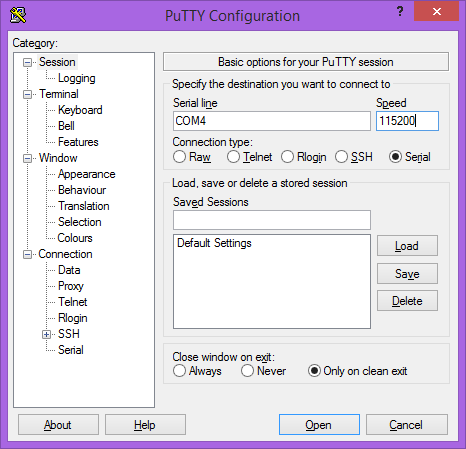
The TS-7100 includes a USB Micro B device port; this uses a 8051 based microcontroller to create a debug/console serial interface on a host PC. The serial console is provided through this port at 115200 baud, 8n1, with no flow control. The USB serial device is a CP210x Virtual COM Port. Most operating systems have built-in support for this device. If not however, drivers are available for the device here.
Console from Linux
There are many serial terminal applications for Linux, three common used applications are picocom, screen, and minicom. These examples demonstrate all three applications and assume that the serial device is "/dev/ttyUSB0" which is common for USB adapters. Be sure to replace the serial device string with that of the device on your workstation.
picocom is a very small and simple client.
sudo picocom -b 115200 /dev/ttyUSB0
screen is a terminal multiplexer which happens to have serial support.
sudo screen /dev/ttyUSB0 115200
Or a very commonly used client is minicom which is quite powerful but requires some setup:
sudo minicom -s
- Navigate to 'serial port setup'
- Type "a" and change location of serial device to "/dev/ttyUSB0" then hit "enter"
- If needed, modify the settings to match this and hit "esc" when done:
     E - Bps/Par/Bits          : 115200 8N1
     F - Hardware Flow Control : No
     G - Software Flow Control : No
- Navigate to 'Save setup as dfl', hit "enter", and then "esc"
Console from Windows
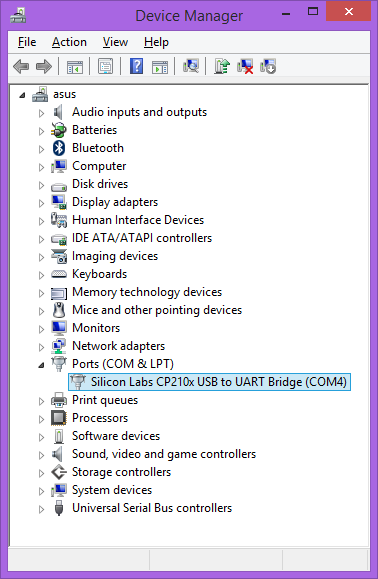
Putty is a small simple client available for download here. Open up Device Manager to determine your console port. See the putty configuration image for more details.
Powering Up
| WARNING: | Be sure to take appropriate Electrostatic Discharge (ESD) precautions. Disconnect the power source before moving, cabling, or performing any set up procedures. Inappropriate handling may cause damage to the board. |
Power input to the TS-7100 is supplied via the power input connector, refer to that section for information on voltage ranges for this device.
Once power is applied to the whole device, there will be output on the debug console port. The following section of the manual provides information on getting the serial console connected.
U-Boot 2016.03-00408-gd450758c91 (Oct 10 2019 - 11:59:08 -0700)

CPU:   Freescale i.MX6UL rev1.2 at 396 MHz
Reset cause: POR
I2C:   ready
DRAM:  512 MiB
MMC:   FSL_SDHC: 0
Net:   FEC0 [PRIME]
Warning: FEC0 (eth0) using random MAC address - 72:12:64:ca:3e:4a

Press Ctrl+C to abort autoboot in 1 second(s)
starting USB...
USB0:   Port not available.
USB1:   USB EHCI 1.00
scanning bus 1 for devices... 1 USB Device(s) found
       scanning usb for storage devices... 0 Storage Device(s) found
No storage devices, perhaps not 'usb start'ed..?
Booting from the eMMC ...
** File not found /boot/boot.ub **
31526 bytes read in 103 ms (298.8 KiB/s)
5253608 bytes read in 354 ms (14.2 MiB/s)
NO CHRG jumper is set, not waiting

Kernel image @ 0x80800000 [ 0x000000 - 0x500220 ]
root ## Flattened Device Tree blob at 83000000
   Booting using the fdt blob at 0x83000000
   Using Device Tree in place at 83000000, end 8300a909

Starting kernel ...
| Note: | The "*** Warning - bad CRC, using default environment" message can be safely ignored when the unit is first booted. This means that no environment variables have been saved to disk, and U-Boot is falling back to the default. If "env save" is run, this will save the environment to disk, and this message will go away unless there is a further issue. |
The default U-Boot boot process will check for USB updates before attempting to boot from on-board eMMC. Details about the bootup process, features, and other U-Boot information can be found in the U-Boot sections.
First Linux Boot
When booting with the default settings, a shipped board will boot to the eMMC. The eMMC by default is pre-programmed with a Debian 10 Buster image. After Debian boots it will ask the user to log in with a username and password. Use "root" as the username with no password. After logging in, a password can be set with the passwd command. Note that this login will only work over the serial console. Debian SSH defaults to not only disallowing un-credentialed logins, but denying root logins altogether.
From the Linux prompt, the hardware can be tested out or application development can begin.

