TS-TPC-7990 Yocto Sections
Yocto is our recommended distribution for graphics packages as the software includes patches to support the GPU. X11 in Yocto includes drivers for providing 2D support as well. Support is also provided for OpenGLES 1&2, as well as GStreamer acceleration, included standalone or with Qt. Yocto also provides cross toolchains that include the rootfs. This toolchain allows integration with the Qt Creator IDE and Eclipse.
Yocto does not provide binary security updates. This distribution also does not have any remote repository of pre-built applications. For either of these we features we recommend using Debian.
Our current Yocto support is based off of Yocto 3.0 "Zeus".
Getting Started with Yocto
Yocto itself is a set of scripts and tools used to build a custom distribution. In our default images we try to include all the common utilities requested by users. Rebuilding Yocto should not be necessary for many users, but is possible if needed. See the Custom Build Yocto section for information on this process.
Our Yocto rootfs tarball is available here:
| Yocto Image | Download Link |
| ts-x11-image (Yocto Zeus) | Download |
To write this to an SD card, first partition the SD card to have one large ext3 partition. Most SD cards include one MBR partition by default. Cards can also be partitioned with fdisk, cfdisk, or the graphical gparted utility. This should be an MBR partition table, not GPT. Once it is partitioned, format the SD and extract this tar with:
# Assuming your SD card is /dev/sdc with one partition
mkfs.ext3 /dev/sdc1
mkdir /mnt/sd/
sudo mount /dev/sdc1 /mnt/sd/
sudo tar --numeric-owner -jxf ts-x11-image-tsimx6-latest.rootfs.tar.bz2 -C /mnt/sd
sudo umount /mnt/sd
sync
| Note: | The ext4 filesystem can be used instead of ext3, but it may require additional options. U-Boot does not support the 64bit addressing added as the default behavior in recent revisions of mkfs.ext4. If using e2fsprogs 1.43 or newer, the options "-O ^64bit,^metadata_csum" must be used with ext4 for proper compatibility. Older versions of e2fsprogs do not need these options passed nor are they needed for ext3. |
To rewrite the eMMC, boot to the SD card. You cannot rewrite the eMMC while it is mounted elsewhere, or used to currently boot the system. Once booted to the SD, run:
mkfs.ext3 /dev/mmcblk2p1
mkdir /mnt/emmc
mount /dev/mmcblk2p1 /mnt/emmc
wget -qO- https://files.embeddedTS.com/ts-socket-macrocontrollers/ts-4900-linux/distributions/yocto/zeus/ts-x11-image-tsimx6-latest.rootfs.tar.bz2 | tar --numeric-owner xj -C /mnt/emmc/
umount /mnt/emmc
sync
The same commands can be used to write SATA by substituting /dev/mmcblk2p1 with /dev/sda1.
First Boot
The stock Yocto image provides a single login of root with no password. With Zeus, the wired ethernet interface will attempt to acquire an IP address via DHCP automatically. However, it is not possible to log in via the network at this time due to security of the device requiring a password for SSH access. Initial login to the device must first be done on the serial console.
Yocto Networking
Our Yocto image uses systemd which stores its network files in /etc/systemd/network/. Yocto will automatically enable DHCP on its wired interfaces. This can be overridden to set a static IP or enable other options for DHCP. The only requirement is that this file is named /etc/systemd/network/XX-wired.network Where "XX" is a number smaller than 80, e.g. /etc/systemd/network/79-wired.network This format must be used for all eth* and en* named network interfaces. The lower file names will take priority.
An example of a static configuration would be:
/etc/systemd/network/42-wired.network
[Match]
Name=eth0

[Network]
Address=192.168.0.50/24
Gateway=192.168.0.1
DNS=192.168.0.1
DNS will be loaded from /etc/resolv.conf. To make this use a static DNS:
rm /etc/resolv.conf
echo "nameserver 8.8.8.8" > /etc/resolv.conf
echo "nameserver 8.8.4.4" >> /etc/resolv.conf
To use the DNS assigned by DHCP, run:
ln -s /run/systemd/resolve/resolv.conf /etc/resolv.conf
For more information on what options are available to configure the network, see the systemd network documentation.
Yocto Wireless
The Atmel driver needs to be loaded manually on units that include wifi. Run 'modprobe wilc3000' to manually load the driver once, or edit /etc/modules and add "wilc3000" on a new line to have the module automatically load on startup.
Yocto uses systemd to start wpa_supplicant, and systemd-networkd to set an IP address via a static setting or DHCP.
Scan for a network
ifconfig wlan0 up

# Scan for available networks
iwlist wlan0 scan
An example of connecting to an open network with an SSID of "default":
          Cell 03 - Address: c0:ff:ee:c0:ff:ee
                    Mode:Managed
                    ESSID:"default"
                    Channel:2
                    Encryption key:off
                    Bit Rates:9 Mb/s
To connect to this open network manually for just this boot:
iwconfig wlan0 essid "default"
Use the 'iwconfig' command to determine authentication to an access point. Before connecting it will show something like this:
# iwconfig wlan0
wlan0     IEEE 802.11bgn  ESSID:"default"
          Mode:Managed  Frequency:2.417 GHz  Access Point: c0:ff:ee:c0:ff:ee
          Bit Rate=1 Mb/s   Tx-Power=20 dBm
          Retry  long limit:7   RTS thr:off   Fragment thr:off
          Encryption key:off
          Power Management:off
          Link Quality=70/70  Signal level=-34 dBm
          Rx invalid nwid:0  Rx invalid crypt:0  Rx invalid frag:0
          Tx excessive retries:0  Invalid misc:0   Missed beacon:0
If connecting using WEP, also specify a network key:
iwconfig wlan0 essid "default" key "yourpassword"
If connecting to a WPA network use wpa_passphrase and wpa_supplicant:
mkdir /etc/wpa_supplicant/
wpa_passphrase "ssid name" "full passphrase" >> /etc/wpa_supplicant/wpa_supplicant-wlan0.conf
After generating the configuration file the wpa_supplicant daemon can be started.
wpa_supplicant -iwlan0 -c/etc/wpa_supplicant/wpa_supplicant-wlan0.conf -B
This will return:
 Successfully initialized wpa_supplicant
 root@ts-imx6-q:~# [  306.924691] wlan0: authenticate with 28:cf:da:b0:f5:bb
 [  306.959415] wlan0: send auth to 28:cf:da:b0:f5:bb (try 1/3)
 [  306.968137] wlan0: authenticated
 [  306.978477] wlan0: associate with 28:cf:da:b0:f5:bb (try 1/3)
 [  306.988577] wlan0: RX AssocResp from 28:cf:da:b0:f5:bb (capab=0x1431 status=0 aid=9)
 [  307.009751] wlan0: associated
 [  307.012768] IPv6: ADDRCONF(NETDEV_CHANGE): wlan0: link becomes ready
 [  307.047989] wlcore: Association completed.
Use 'iwconfig wlan0' to verify an "Access Point" is specified to verify a connection. This will also report the link quality to the AP.
Wireless may be associated, but this does not get an IP on the network. To connect to the internet or talk to the internal network first configure the interface. See configuring the network, but on many networks only a DHCP client is needed:
udhcpc -i wlan0
Systemd can also be configured to start wpa_supplicant on boot up.
# Assuming the same path for the wpa conf file as shown above
systemctl enable wpa_supplicant@wlan0
systemctl start wpa_supplicant@wlan0
Once this service is started it will bring up the wlan0 interface and associate it to the SSID that is noted in the wpa_supplicant.conf file. Configure the IP settings the same way as a wired network.
In /etc/systemd/network/wlan0.network
[Match]
Name=wlan0

[Network]
DHCP=yes
For a static configuration create a config file for that specific interface. /etc/systemd/network/wlan0.network
[Match]
Name=wlan0

[Network]
Address=192.168.0.50/24
Gateway=192.168.0.1
DNS=192.168.0.1
For more information on what options are available to configure the network, see the systemd network documentation.
Yocto Application Development
Yocto provides a cross toolchain including the native tools and required ARM libraries. The cross toolchain is only available for 64bit Linux host PCs. Download the toolchain by saving the following link:
In order to install the toolchain, use the following commands to run the installation script:
chmod a+x poky-*.sh
sudo ./poky-*.sh
In order to use the toolchain, the environment for it must be sourced to the current terminal before it can be used to build applications: To build an application first source the environment for the toolchain:
source /opt/poky/3.0.2/environment-setup-cortexa9t2hf-neon-poky-linux-gnueabi

# This command sets up paths for the shell along with a number of other
# environment variable. For example:
$ echo $CC
arm-poky-linux-gnueabi-gcc -march=armv7-a -marm -mthumb-interwork -mfloat-abi=hard -mfpu=neon -mtune=cortex-a9 --sysroot=/opt/poky/3.0.2/sysroots/cortexa9hf-vfp-neon-poky-linux-gnueabi

# Cross compiling a simple hello world program:
$CC hello.c -o hello
It is also possible to develop applications directly on the device via serial console or ssh. Yocto includes development tools such as vim, gcc, g++, gdb, make, autoconf, binutils, etc. See the next sections for using the cross toolchain with IDEs.
Configure Qt Creator IDE
| Note: | This guide is intended for our stock Yocto image using systemd. On custom images, the same instructions should apply if a cross toolchain is built. This can be built through Yocto with bitbake meta-toolchain-qt5. Be sure to update the paths if using a different distribution.
|
Install the qtcreator tool on a host Linux PC. Any recent version from a modern Linux distribution should be sufficient and work without issue. On a Debian/Ubuntu desktop, run:
sudo apt-get update && sudo apt-get install qtcreator -y
The SDK which includes the Qt support will also need to be downloaded. The cross toolchain is only available for 64-bit Linux host PCs:
In order to install the toolchain, use the following commands to run the installation script:
chmod a+x poky-*.sh
sudo ./poky-*.sh
These instructions assume the installation path will be the default at /opt/poky/3.0.2/
| Note: | An environment script has to be sourced before every execution of qtcreator. Without this, builds will fail. |
source /opt/poky/3.0.2/environment-setup-cortexa9t2hf-neon-poky-linux-gnueabi
qtcreator
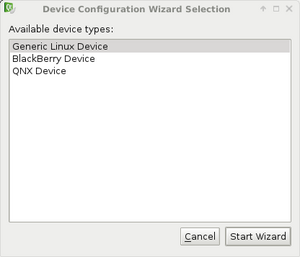
Qt Creator needs to be configured to build using this toolchain. Once Qt Creator is launched, select Tools->Options->Devices Click Add, select Generic Linux Device, and then click Start Wizard
 |
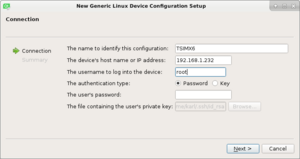
On the next page specify the IP address or hostname of the device running Yocto. In this example, the unit has an IP address of 192.168.2.45 obtained via DHCP. The default Yocto image will use the user root with no password to connect. Set the name to TSIMX6
 |
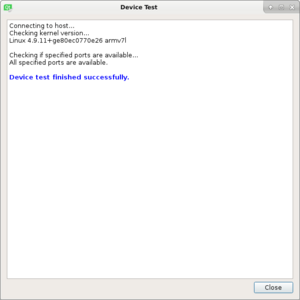
It will then verify connectivity. Click close and continue.
 |
| Note: | The paths given in the images below may not match the latest toolchain, but are meant to show where these values would go. Follow the text appropriate to the architecture of your host PC for the correct values |
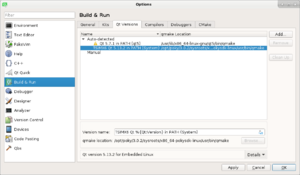
In the left column of the Options menu, select Build & Run. On the Qt Versions tab, click Add in the upper right to configure the TS Kit. Qt Creator may see the qmake binary added to your path from the sourced environment script. If this is detected, add in the string TSIMX6 to the title as shown in the photo below. If it is not autodetected, add the full path and ensure the version name is set to TSIMX6 Qt 5.13.2. This will allow it to be recognized when setting the right binary for the kit.
/opt/poky/3.0.2/sysroots/x86_64-pokysdk-linux/usr/bin/qmake
 |
On the Compilers tab click Add, select GCC then C. Set the Name to TSIMX6 GCC. For the Compiler Path use the following:
/opt/poky/3.0.2/sysroots/x86_64-pokysdk-linux/usr/bin/arm-poky-linux-gnueabi/arm-poky-linux-gnueabi-gcc
Repeat the above steps for the g++ compiler; click Add, select GCC then C++. Set the name to TSIMX6 G++. And for the Compiler Path use the following:
/opt/poky/3.0.2/sysroots/x86_64-pokysdk-linux/usr/bin/arm-poky-linux-gnueabi/arm-poky-linux-gnueabi-g++
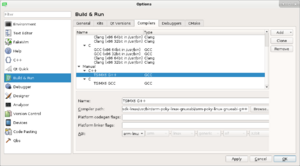 |
On the Debuggers tab click Add. For name, specify TSIMX6 GDB. For the path, specify the location of gdb with the following:
/opt/poky/3.0.2/sysroots/x86_64-pokysdk-linux/usr/bin/arm-poky-linux-gnueabi/arm-poky-linux-gnueabi-gdb
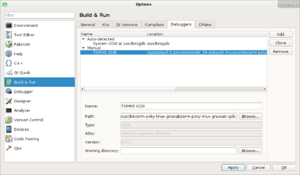 |
On the Kits tab click Add. For Name, enter TSIMX6. Set device type to Generic Linux Device. Set the device to TSIMX6 (default for Generic Linux). Set Qt mkspec to the following (make sure there is no space at the end):
/opt/poky/3.0.2/sysroots/cortexa9t2hf-neon-poky-linux-gnueabi/usr/lib/mkspecs/linux-oe-g++
Set C Compiler to TSIMX6 GCC and C++ Compiler to TSIMX6 G++. Set Debugger to TSIMX6 GDB. Set the Qt version to TSIMX6 QT 5.13.2. Finally, click Apply.
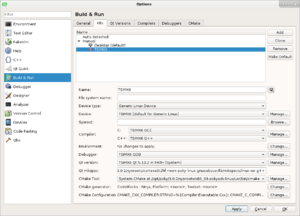 |
| Note: | If there is a red exclamation point over the kits icon, it indicates that the compiler ABI does not match. In this case, you will need to revisit the "Compiler", "Debugger", and "Qt Versions" tabs, and browse the host PC for these files manually rather than copy/pasting the paths from these instructions. This is a bug in Ubuntu 16.04's Qt Creator, and may be in later versions as well. |
At this point Qt Creator is set up to begin a hello world project.
Qt Creator Hello World
Open the Qt Creator IDE and click New Project.
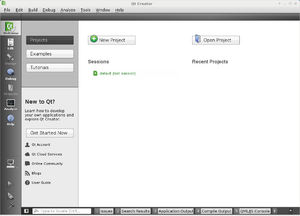 |
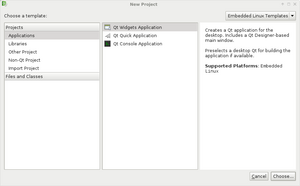
Qt provides multiple templates for application development. For this example select the default Qt Widgets Application.
 |
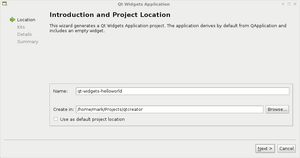
Specify the location for your project. Keep in mind that the compile process will create more build paths in the Create In: path.
 |
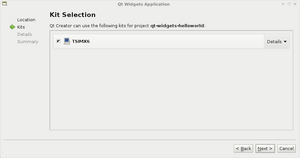
Next, select the kit. The TSIMX6 is the kit we set up in the last section, but you may have other kits pre-installed on your system. These can be used for testing graphical development on your PC. Keep in mind distribution versions may contain different functionality.
 |
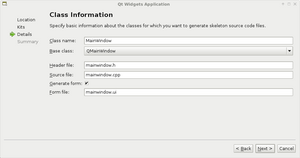
Next select the class and filename information. This example will use the defaults.
 |
Select any version control for the project. The example will use none and finish the wizard. This will generate the new project.
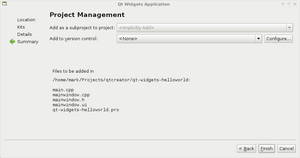 |
Click the button under Help on the left column, and select TSIMX6 debug. If there is only one kit selected, this will be default.
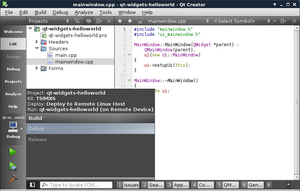 |
Now return to edit, and open the Qt project file, qt5-helloworld.pro. Add in these lines anywhere after the target is specified:
linux-* {
    target.path = /home/root
    INSTALLS += target
}
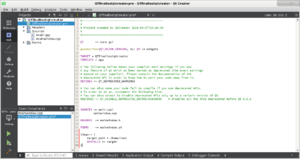 |
Last, the DISPLAY must be selected. This is done by setting a run environment variable that will be set when the application is run on the board.
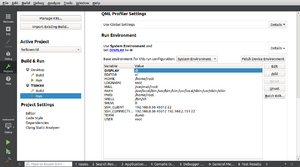 |
At this point click the green allow in the bottom left to run the application. This can also be launched from the menu at Build->Run.
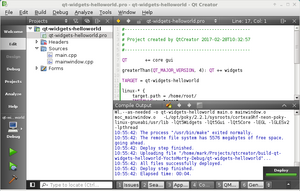 |
From here, you can begin customizing your application. Refer to the official Qt documentation for more information
Yocto Hide Cursor
The default image includes the xcursor-transparent icon theme. This can hide the mouse pointer. To enable this, run these commands:
mkdir -p ~/.icons/default/

echo "[Icon Theme]" > ~/.icons/default/index.theme
echo "Inherits=xcursor-transparent" >> ~/.icons/default/index.theme

# Now reset x, or reset the unit and the cursor will be invisible.
Yocto Startup Scripts
To have a custom headless application start up at boot a systemd service needs to be created. Create the file /etc/systemd/system/yourapp.service with contents similar to below:
[Unit]
Description=Run an application on the i.MX6

[Service]
Type=simple
ExecStart=/usr/local/bin/your_app_or_script

[Install]
WantedBy=multi-user.target
If an application depends on networking, the systemd script will want to have After=network.target in the Unit section. Once this file is in place, it can be added to automatic startup with the following:
# Enable the application to be started on boot up
systemctl enable yourapp.service

# Start the application now, but will not affect automatic startup
systemctl start yourapp.service
| Note: | See the systemd documentation for in depth documentation on services. |
To set up a graphical application startup, modify the /usr/bin/mini-x-session file
At the end of the script replace matchbox-terminal with the desired application (absolute path may need to be specified):
matchbox-terminal &
exec matchbox-window-manager
The exec statement must be last in the script in order to take over this script's PID for correct operation.
Custom Build Yocto
If our stock Yocto distribution does not meet all of your needs, it is possible to re-build it with a custom set of features. Including less options for a smaller footprint, or more packages to add more features.
While we may provide guidance, our free support does not include every situation that can cause a build failure in generating custom images.