TS-7200
 | |
| Product Page | |
| Documentation | |
|---|---|
| Schematic | |
| Mechanical Drawing | |
| FTP Path | |
| Cirrus Logic EP9302 | |
| CPU User Guide |
Overview
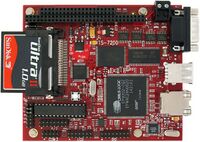
The TS-7200 is a compact, full-featured Single Board Computer (SBC) based upon the Cirrus EP9302 ARM9 CPU, which provides a standard set of on-board peripherals.
Getting Started
A Linux PC is recommended for development. For developers who use Windows, virtualized Linux using VMWare or similar are recommended in order to make the full power of Linux available. The developer will need to be comfortable with Linux anyway in order to work with embedded Linux on the target platform. The main reasons that Linux is useful are:
- Linux filesystems on the microSD card can be accessed on the PC.
- More ARM cross-compilers are available.
- If recovery is needed, a bootable medium can be written.
- A network filesystem can be served.
- Builds such as Linux kernel, buildroot, yocto, distro-seed will not work from WSL1/2 on a case insensitive filesystem.
| WARNING: | Be sure to take appropriate Electrostatic Discharge (ESD) precautions. Disconnect the power source before moving, cabling, or performing any set up procedures. Inappropriate handling may cause damage to the board. |
With the TS-7200 there is a terminal block power connector which is removable to expose 2 pins you can also use to supply power.
Get a Console
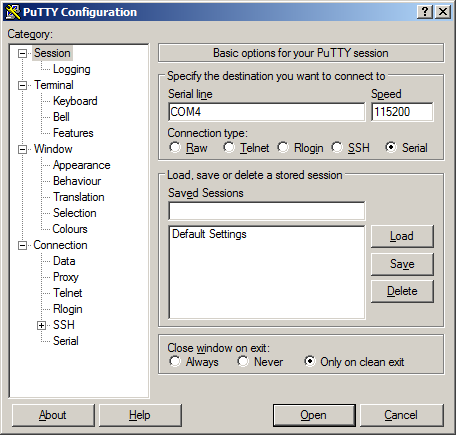
The default console is available on the DB9 port using the a 115200 baud, 8n1 connection with no flow control. You also must have JP2 in place in order to enable the console out. You can redirect console to COM2 by enabling JP4.
Use a null modem cable to connect the ARM system to your workstation. If you do not have a COM port on your system (as many newer systems do not), you can find a USB serial adapter that will bring out RS232.
Console from Linux
There are many serial clients for Linux, but 3 simple ones would be picocom, screen, and minicom. These examples assume that your COM device is /dev/ttyUSB0 (common for USB adapters), but replace them with the COM device on your workstation.
Linux has a few applications capable of connecting to the board over serial. You can use any of these clients that may be installed or available in your workstation's package manager:
Picocom is a very small and simple client.
picocom -b 115200 /dev/ttyUSB0
Screen is a terminal multiplexer which happens to have serial support.
screen /dev/ttyUSB0 115200
Or a very commonly used client is minicom which is quite powerful:
minicom -s
- Navigate to 'serial port setup'
- Type "a" and change location of serial device to '/dev/ttyUSB0' then hit "enter"
- If needed, modify the settings to match this and hit "esc" when done:
     E - Bps/Par/Bits          : 115200 8N1
     F - Hardware Flow Control : No
     G - Software Flow Control : No
- Navigate to 'Save setup as dfl', hit "enter", and then "esc"
Console from Windows
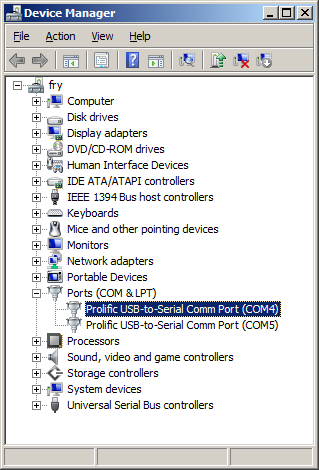
Putty is a small simple client available for download here. Open up Device Manager to determine your console port. See the putty configuration image for more details.
You can also telnet to the board with the default network configuration which will provide telnet.
Jumpers
| Jumper | Description | Address | Bit | Description |
|---|---|---|---|---|
| JP1 | Boot to serial port COM1. | N/A | ||
| JP2 | Enable serial console (COM1 Default) | 0x1080_000 | 0 | On=1 |
| JP3 | Write enable flash. | 0x1080_000 | 1 | On=1 |
| JP4 | Redirects console to COM2 (with JP2 on) | 0x1080_000 | 3 | On=0 |
| JP5 | Enables Testing | 0x1080_000 | 4 | On=0 |
| JP6 | User Configurable | 0x2280_000 | 0 | On=1 |
Backup / Restore
Compact Flash
If backing up on a separate workstation, keep in mind windows does not have direct block device support needed to write these images. You will also need to determine the CF card device. You can usually find this in the output of 'dmesg' after inserting the CF card and you will typically see something like '/dev/sdb' as the block device and '/dev/sdb1' for the first partition. On some newer kernels you will see '/dev/mmcblk0' as the block device and '/dev/mmcblkop1' for the first partition. For these examples I will use the '/dev/mmcblk0' format.
If you are backing up directly on the board you will likely need to use some kind of offboard storage like a thumbdrive or external hard drive.
You can find the latest CF card image here which will contain the Debian OS. Make sure you decompress the image before writing.
Backup
Entire SD card
dd if=/dev/mmcblk0 of=/path/to/backup.dd bs=32k
Kernel
dd if=/dev/mmcblk0p2 of=/path/to/zImage bs=32k
Initrd
dd if=/dev/mmcblk0p3 of=/path/to/initrd bs=32k
Restore
Entire SD card
dd if=/path/to/backup.dd of=/dev/mmcblk0 bs=32k
Kernel
dd if=/path/to/zImage bs=32k of=/dev/mmcblk0p2
Initrd
dd if=/initrd bs=32k of=/dev/mmcblk0p3
eCos RedBoot
RedBoot is a feature rich boot-ROM monitor, that allows manipulation of the on-board flash, JFFS and YAFFS images, loading and execution of a kernel or executable from either tftp (trivial ftp), http or flash, and gdb debugging stubs. From RedBoot, one can load and execute any standalone binary. Most commonly, a Linux kernel binary is used. One can also write applications within the eCos environment and load them with RedBoot. Please refer to Sourceware for more information on programming for eCos.
Operating Systems
On the compact flash we have enough room to provide Debian. This provides a very mature OS with many packages, but does require significantly more space. For the onboard flash we have developed TS-Linux which requires very little space while still providing a powerful system.
Debian
Our boards boot a standard Debian installation which provides a large amount of software that you can install with relatively little effort. See the Debian page for more general information on installing/removing software, and further documentation.
For this series we provide the Debian versions Woody, Sarge, Etch and Lenny. The EP9302 supports both OABI and EABI, so future Debian distributions may be run on the SBC, but will not be supported. We do provide distributions available as archives separate from the images. You can find them on this folder on the ftp. You will need a linux system to extract it:
# Replace the mmcblk0p4 device with your card
# on your workstation
mount /dev/mmcblk0p4 /mnt/sd/
cd /mnt/sd/
tar --numeric-owner -xvf /path/to/debian-lenny-arm-latest.tar.gz
cd ../
umount /mnt/sd/
You can download the different Debian minimal installs for x86 from here and install it on a PC or virtual machine to become more familiar with a debian environment or even specific distribution.
TS-Linux
This is our minimalistic Linux system based off of busybox which provides a very simple OS to run your application.
Network Configuration
The main utilities for network configuration under Linux are:
- ifconfig: prints network settings and configures ethernet interfaces
- ifup: turns given network interface up
- ifdown: turns given network interface down
Entering “ifconfig” shows the current ethernet settings. These utilities require a network device as parameter. On Linux, the ethernet devices are generally named eth0, eth1, etc. Therefore, the command “ifup eth0” or “ifconfig eth0 up” brings up the on-board ethernet interface on TS-72XX SBCs.
To configure the network, you need to manage the proper configuration files. On TS-Linux systems, these files are located in the “/etc/sysconfig/” directory. By default, Linux systems on TS-72XX boards are configured to assign the IP 192.168.0.50 to the on-board ethernet interface.
To configure the network when booting to the TS-Linux image on the flash chip, the files in "/etc/sysconfig/" must be edited. Network interfaces are configured on a file per interface basis. The first Ethernet device, eth0, is controlled by the file "/etc/sysconfig/ifcfg-eth0". An example of "ifcfg-eth0" is shown below:
 DEVICE=eth0 #Name of ethernet interface
 IPADDR=192.168.0.50 #IP address of this ethernet interface
 NETMASK=255.255.255.0 #Used with NETWORK to determine local IPs
 NETWORK=192.168.0.0 #Used with NETMASK to determine local IPs
 BROADCAST=192.168.0.255 #Broadcast IP for system wide messages
 BOOTPROTO=static #Static IP (change "static" to “DHCP”)
 ENABLE=yes #Load device on boot
The TCP/IP network settings are configured in the file '/etc/sysconfig/network_cfg':
 NETWORKING=yes #Enable networking on startup
 GATEWAY="192.168.0.1" #Gateway for internet access
 GW_DEV=eth0 #Default gateway
 HOSTNAME=ts7200 #Host name of this computer
 BOOTPROTO=no
 FORWARD_IPV4=no
 DEFRAG_IPV4=no
The TCP/IP name resolution server is configured in '/etc/resolv.conf':
nameserver 192.168.0.1 #Name server for domain name lookups
Those lines starting with a # symbol are comments. As the above example shows, eth0 is given the static address of 192.168.0.50. If one wishes eth0 to obtain its IP from a DHCP server, then change the line BOOTPROTO=static to BOOTPROTO=dhcp. In order to test the default network settings with TS-Linux, open a web browser and use the embedded Apache web server by entering the default IP 192.168.0.50, or simple "ping" or "telnet" to 192.168.0.50.
Services
TS-Linux includes solutions for the main network services, including Telnet, HTTP, FTP, SSH, NFS and Mail. Some of these services can be started, restarted or stopped by management scripts located at the "/etc/init.d" directory. For example, the following command will restart the apache server:
/etc/init.d/apache restart
Also, the "/etc/inet.conf" file is used to configure the initialization and parameters of other services.
NetBSD
NetBSD is a very powerful open operating system which runs on everything including your toaster.
Initial NetBSD support for the TS-7200 was committed to the NetBSD -current CVS repository on December 24, 2004 as a subconfiguration of the NetBSD/evbarm port. Current supported peripherals are described on the NetBSD/evbarm webpage. As a kernel, the most notable hardware support difference between the current NetBSD kernel and the Linux 2.4.26 kernel currently shipping by default with the TS-7200 is that NetBSD has an isabus driver that allows PC/104 cards to be more fully utilized on the TS-7200. Getting generic ISA bus drivers to work with Linux can be very difficult due to the x86 style ISA assumptions throughout the kernel. Linux right now does have something NetBSD does not and that is support for using the onboard flash as a filesystem (NetBSD requires the CF to boot). NetBSD has support for the watchdog timer on the TS-7200 and can also boot very easily to a USB thumb drive or mass storage device. Linux currently has no watchdog driver and has to use a very technical incantation involving an initrd and a pivot_root to boot USB drives. Kernel bootup time is slightly longer on NetBSD than Linux, but can be improved by disabling certain drivers and certain (overly conservative) delays.
Installing NetBSD
All TS-7200's come pre-installed with Linux since Linux is Technologic System's most marketable platform. Installing NetBSD is not difficult and can be done from the RedBoot ROM monitor completely from the internet. Before you start, you'll want to make sure you have at least version 1.04 of the TS-BOOTROM firmware installed. Also, there is currently no gzimg for the 16MB onboard flash versions of the TS-7200. Send a message to joff-AT-embeddedARM.com if you have a 16MB flash unit you would like to try NetBSD on. The first thing you'll want to do is use the RedBoot command fconfig to set your IP address and default gateway so that you can access the internet. After that, you need to load the 5MB install kernel from the internet using the command:
load -v -r -b 0x00200000 -h 67.40.67.44 -m http /ftp/ts-arm-sbc/ts-7200-netbsd/netbsd-TS7200_INSTALL.bin
Note that this may take some time as eCos/RedBoot is not particularly speedy at downloading via HTTP. You may alternatively download the file to a TFTP or HTTP server on your local network which may speed things up. After successfully downloading the install image to RAM, type go to start the kernel and menu driven installation program. The NetBSD installation program will take you through installing NetBSD to your CompactFlash card or USB thumb drive. Just installing the minimal number of sets will require a 128MB CF, and although you can run the full OS with compilers in a 256MB CF, you need 512MB to install it because of required temporary storage of the downloaded set tarballs. When the time comes to ask for the installation medium, choose "FTP" and accept the default parameters since the installation kernel you downloaded from Technologic Systems will default to the correct FTP location (also at Technologic Systems).
After the OS has been installed to the CF, you need to write a kernel to the onboard flash and tell RedBoot to boot it. A kernel that boots to CF is downloadable via HTTP and can be written using the following sequence of commands:
- Load NetBSD gzimg from HTTP into RAM
load -v -r -b 0x00200000 -h 67.40.67.44 -m http /ftp/ts-arm-sbc/ts-7200-netbsd/gzimg_TS7200_wd0_flash_0x60660000
- To delete flashed Linux kernel
fis delete vmlinux
- Puts the gzimg into the RedBoot FIS
fis create -b 0x00200000 -l 0x160000 -f 0x60660000 netbsd.gz
Once the gzimg image has been written to flash, you can modify your RedBoot bootscript to issue the command go 0x60660000 which will then start NetBSD on your TS-7200
Using NetBSD
NetBSD has a separate sub-project dubbed pkgsrc that handles package management and building of the several thousand other open-source projects. This is somewhat akin to RedHat's RPM or Debian's dpkg/apt-get facilities. Currently, ftp.netbsd.org only has pre-built binary packages for evbarm from the NetBSD-1.6 release of pkgsrc. You can use these by setting the PKG_PATH environment variable to ftp://ftp.netbsd.org/pub/NetBSD/packages/1.6/evbarm/All then running pkg_add, e.g. pkg_add -v perl. Package dependencies are downloaded and installed automatically providing functionality similar to Debian's apt-get. Note, however, the typical usage of the NetBSD pkgsrc framework is downloading/extracting the pkgsrc framework tarball into /usr/pkgsrc and building each package right on the hardware that will run it. This is a little bit more involved on the TS-7200 since one rarely has the patience to compile completely on a 200Mhz ARM. Instead, the recommended way would be to use the distcc compiler to distribute the compiling to a higher power workstation running the distccd daemon with the ARM netbsd cross toolchain across the network. This way, the TS-7200 is still running the build, but the bulk of the CPU-intensive parts are offloaded to another machine.
Besides pkgsrc, another notable difference is in the NetBSD startup configuration. Linux distributions vary, but they typically use the SysV initialization scheme with numbered runlevels 1-6, startup scripts in /etc/init.d/* and specially named symlinks in /etc/init.d/rc##.d directories corresponding to each runlevel. NetBSD uses a simplified startup configuration where single lines of the form sendmail=YES or inetd=NO are appended to the /etc/rc.conf file. System defaults are sourced first from /etc/defaults/rc.conf and the user may open this file for finding all the available modifiable configuration knobs and then override them with entries in /etc/rc.conf.
Network interfaces are also slightly different in NetBSD. Instead of each ethernet like device being named eth0, eth1, eth2, etc., each device is named according to the actual device. On the TS-7200, the on-board ethernet is named "epe0", short for EP93xx Ethernet. To set IP addresses, the ifconfig command is available with semantics similar to those in Linux. Alternatively, you may have the system set the device up at bootup by appending a line of the form ifconfig_epe0="192.168.0.50" to the /etc/rc.conf file. To use DHCP, append a line dhclient=YES to /etc/rc.conf. The default route is set with a line in /etc/rc.conf of the form defaultroute="192.168.0.1".

