Getting Started with tsctl on the TS-8820
Getting Started
First, download and install the latest version of tsctl as documented in the Getting Started Guide.
Now start the tsctl shell:
$ tsctl
tsctl>
Let's check that we really have a TS-8820.
tsctl> System BaseBoardId
0x00008820
Digital Outputs
There are 6 digital outputs on the TS-8820: 4 isolated outputs (OUT1, OUT2, OUT3, and OUT4) on block P7, and two non-isolated outputs (OUT5, OUT6) on block P2. When libtsctl detects a TS-8820 present, it automatically defines mappings between these names and the corresponding DIO numbers. You can see the DIO numbers by calling the MapLookup function in the system object. First, let's switch to decimal output.
tsctl> Mode Dec
tsctl> System MapLookup;8820_OUT1;8820_OUT2;8820_OUT3;8820_OUT4;8820_OUT5;8820_OUT6;;;
204
205
206
207
208
209
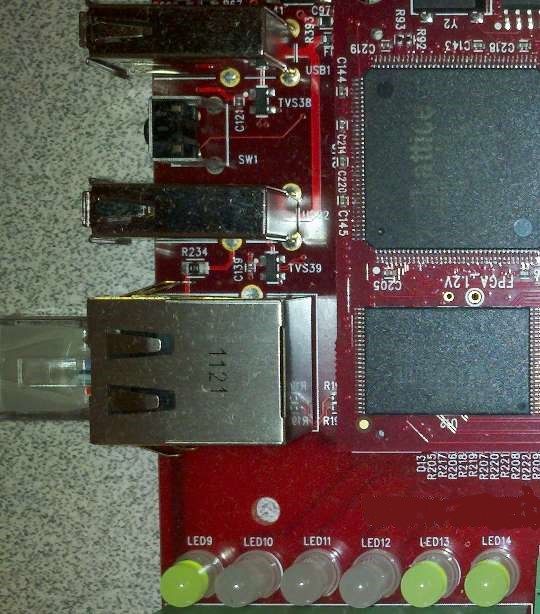
This output in these examples is using a TS-4700; if you are using a different CPU board (e.g. the TS-4800) the exact numbers will be different. The tsctl command line client automatically performs these lookups if you use the string name when a number is expected. Let's look at an example. There is an LED labelled LED9 on the TS-8820 which shows the current state of the OUT1 digital output. It is located between the P1 terminal block and the ethernet connector as shown in this picture:
First, let's check on the state of this LED. At power-up the DIO defaults to LOW, so unless something has changed that you should see the following output:
tsctl> DIO
tsctl DIO> GetAsync 8820_OUT1
LOW
If the output is LOW, then run the following command to set it HIGH, then read back the value:
tsctl DIO> SetAsync 8820_OUT1 HIGH
tsctl DIO> GetAsync 8820_OUT1
HIGH
Your board should now match the above picture, with LED9 on. You can experiment with OUT2 through OUT6. The isolated outputs correspond to LED 9 through LED12 while the non-isolated outputs each have two LEDs, one inverted and one non-inverted, these are LED13 and LED27, respectively, for OUT5, and LED14 and LED28, respectively, for OUT6. From the perspective of the above picture, the non-inverted LEDs (LED27 and LED28) are below the bottom of the picture, between terminal blocks P1 and P2.
Digital Inputs
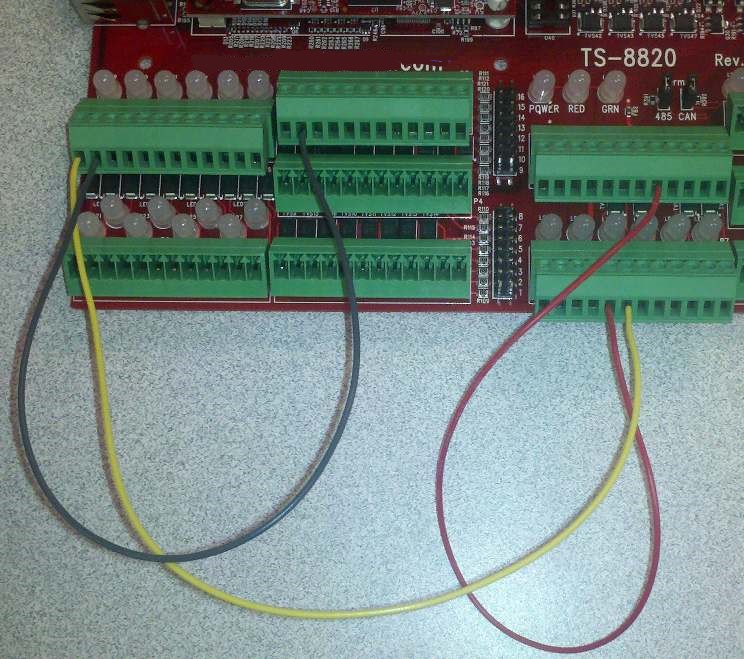
There are 14 digital inputs on the TS-8820. The first 8 (named IN1 through IN8) are isolated, while the remaining 6 (named IN9 through IN 14) are only buffered To experiment with the digital inputs you will need to feed a compatible signal that can toggle the input under your control. The simplest way to do this will be to connect it to other outputs on the board. You will need several pieces of stripped wire long enough to connect various terminal points together. First, connect OUT1 to IN1. Since OUT1 is an isolated output it acts like a switch, so you will need to wire OUT1+ to a voltage reference and OUT1- to IN1+. Since IN is an isolated input, you will need to wire IN1- to a ground common with the reference voltage. The follow picture illustrates with the YELLOW wire connecting OUT1- to IN1+, the GRAY wire connecting IN1- to GROUND, and the RED wire connecting OUT1+ to EXT_12V_24V.
Now read the state of IN1. It should be INPUT_HIGH, as we set OUT1 to HIGH in the previous section. Next, set OUT1 to LOW and verify that IN1 follows to INPUT_LOW:
tsctl DIO> GetAsync 8820_IN1
INPUT_HIGH
tsctl DIO> SetAsync 8820_OUT1 LOW
tsctl DIO> GetAsync 8820_IN1
INPUT_LOW
ADC Channels
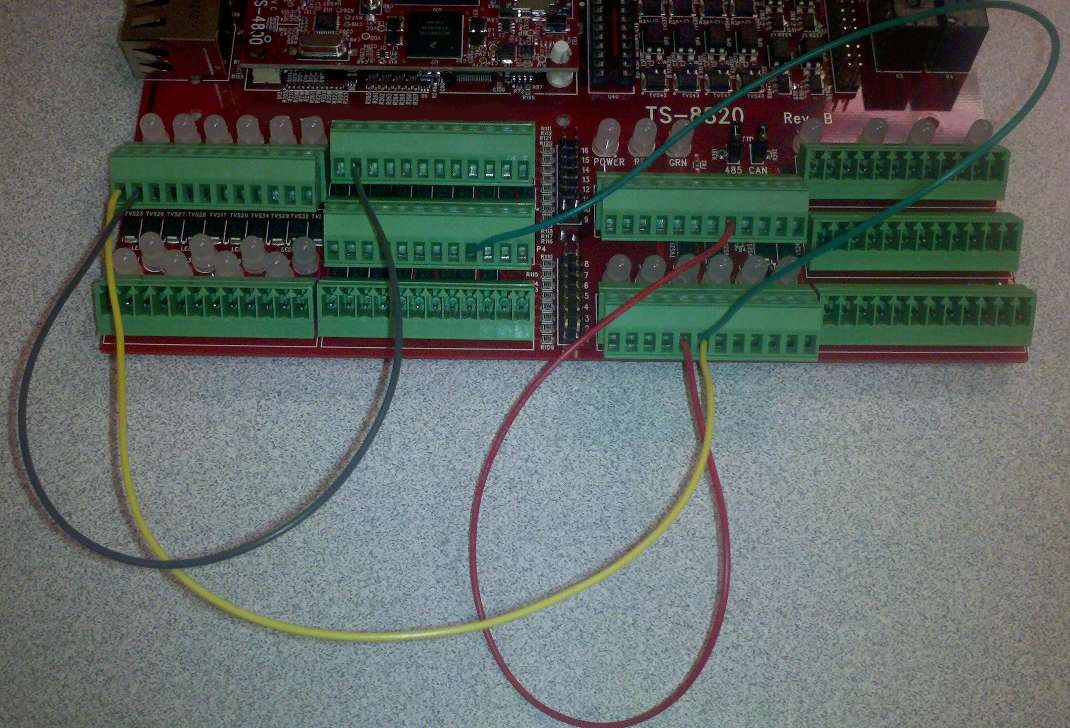
There are 16 ADC channels on the TS-8820. Continuing with our previously wired board, add a wire from OUT1+ to ADC11, as shown by the added GREEN wire in this picture:
Next, use the AIO Get command to read the analog value with OUT1 both in the LOW and HIGH states. Analog channels are zero-numbered in tsctl, so for ADC11 we read channel 10.
tsctl DIO>
tsctl> AIO Get 10
1337
tsctl> DIO SetAsync OUT1 HIGH
tsctl> AIO Get 10
39370
The readings you get will depend on the supply voltage you are using. The Get function returns a 32-bit value which is the raw reading of the ADC. The default range for the ADC is -10V to +10V, and the precision of the ADC is 16-bit. The voltage is calculated by the formula:
V=n*IV/2^p
where n is the value returned by the ADC, IV is the input voltage range (max input voltage - minimum input voltage) and p is the number of bits of precision.
V = 39370 * 20 / 2^16 = 12.014V
The low voltage is:
V = 1337 * 20 / 2^16 = 0.408V
Which corresponds to 0V. In this case, since the value is not quite zero, a calibration function might be desired.
In this example, we can see that we are using a 12V power supply.
DAC Channels
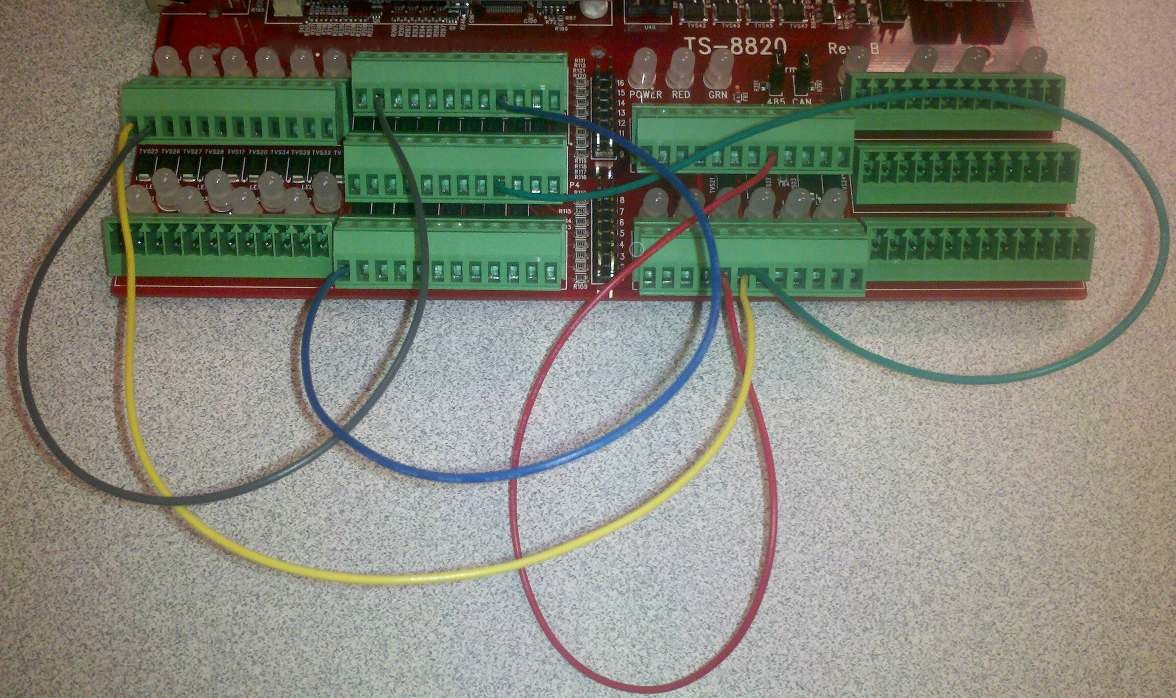
There are 4 DAC outputs. For this demonstration, first connect DAC1 to ADC1 as shown in the picture below.
The new BLUE wire makes the connection. The DAC outputs are 12-bit precision, so the output value will be in the range of 0-4095. The following commands will set DAC1 to 0V, 10V, and 5V, reading ADC1 after each change in output. Note that on the TS-8820 AIO instance 0 (the default) is the ADC, while the DAC is AIO instance 1.
tsctl> AIO:1 Put 0 0
1
tsctl> AIO Get 0
387
tsctl> AIO:1 Put 0 4095
1
tsctl> AIO Get 0
32767
tsctl> AIO:1 Put 0 2048
1
tsctl> AIO Get 0
16757
If you have a scope you may wish to experiment further. First, set up the scope to display 0-10V. Put a probe on OUT1, set the trigger for the channel the probe is on, and set the voltage level to trigger on a rising edge at a slightly positive voltage such as 0.5 V. Use a time division of 50ms. Set t=0 about one division from the left edge of the scope, and set up for a single capture. Then run the following commands:
SAMPLES=`I=0;while [ $I -le 4095 ]; do echo -n $I\;; let I=$I+1; done`
tsctl "AIO:1 Put 0;$SAMPLES"
The first command creates a list of numbers from 0 to 4095, and the second sequentially feeds all the values to the DAC. If all goes well, you should see a ramp from 0V to 10V that takes under 300ms, or around 70us per sample output.
PWM
There are eight (8) PWM outputs available on the TS-8820. The first six override the digital outputs. From our previous section, OUT1 is already wired to ADC11. Let's change OUT1 to a PWM, and then take several ADC samples at different PWM frequencies to verify that it is working properly. First, let's set the parameters for the PWM using the EDIO class. This can be done using either the PWM function, which takes as parameters the low time and high time in nanoseconds, or the PWMfd function, which takes a frequency in milliHertz and a duty cycle in millionths of a percent. Let's use the first one to create a 500Hz square wave, that is, a 1 million nanosecond high time and a 1 million nanosecond low time.
tsctl> EDIO PWM 8820_OUT1 1000000 1000000
1
Next, before the PWM actually drives the output, we must set the OUT1 pin to MODE_PWM, as by default it is in MODE_DIO.
tsctl> Pin ModeSet 8820_OUT1 MODE_PWM
1
Now the PWM should be outputting a square wave. Let's take some A/D samples to confirm this. First, let's configure the sample period on the A/D channel in question. Since we have a 500Hz square wave, we will want our sample period to be no more than 1,000,000 nanoseconds (1 millisecond) long. However, just to be on the safe side we will sample ten times faster than this. The TS-8820 architecture divides the ADC into two banks of 8 channels each. If any channel in the top bank is enabled, then the corresponding channel in the lower bank must be enabled as well. This means we need to enable channel 2 needs to be enabled for channel 10 to be enabled.
Note: There are also simplified commands that can be used for configuration. Consult the API reference for these.
tsctl> AIO Configure -10:-10:-10:-10:-10:-10:-10:-10:-10:-10:-10:-10:-10:-10:-10:-10 10:10:10:10:10:10:10:10:10:10:10:10:10:10:10:10 16:16:16:16:16:16:16:16:16:16:16:16:16:16:16:16 0:0:100000:0:0:0:0:0:0:0:100000:0:0:0:0:0 0:0:0:0:0:0:0:0:0:0:0:0:0:0:0:0 0
1
Now let's take some samples. Since two channels are enabled, every other sample (starting with the second) will be channel 10.
tsctl> AIO Gets16 160
160
753:1605:753:1563:752:1533:752:1510:753:1492:753:1479:752:1468:752:1457:752:1448:753:1442:
753:1434:752:15215:753:15207:751:15204:753:15220:754:15224:752:15218:752:15208:752:15201:753:15220:
751:15222:752:15220:752:15208:751:15200:755:2610:752:1706:753:1618:753:1570:752:1537:753:1513:
752:1497:752:1482:754:1470:754:1459:752:1450:752:1443:752:1436:753:15205:751:15208:752:15204:
752:15214:753:15221:753:15220:752:15212:752:15202:753:15214:752:15223:753:15221:752:15210:752:15203:
752:4073:753:1739:753:1631:753:1577:752:1543:753:1518:753:1500:753:1486:752:1473:753:1461:
751:1452:752:1445:754:1438:753:15248:752:15211:752:15204:752:15210:752:15221:753:15224:753:15211:
753:15205:752:15210:753:15222:753:15222:753:15213:751:15205:751:13467:752:1778:753:1646:753:1588
The LOW value from the PWM is around 1500, and the HIGH value is around 15200. In the output above, we see around 13 samples LOW followed by 13 samples HIGH, except at the ends where we started or stopped sampling in the middle of a given state. We therefore have a 50% duty cycle, and we can calculate that the actual frequency of the PWM from this formula:
f = samples_per_second_base_unit / number_of_base_units / samples_per_cycle
1,000,000,000 / 100,000 / 26 = 384.615Hz
This is lower than our requested 500Hz, but why? The answer is that the TS-8200 PWM can only generate a fixed set of frequencies. When we request a given frequency, what we will actually get is the closest frequency that can be generated. The frequencies available are defined by 12207Hz/(2^prescalar), where the prescalar is 0-7. The available frequencies are therefore 12207Hz, 6104Hz, 3052Hz, 1526Hz, 763Hz, 381Hz, 190Hz, and 95Hz. 381Hz is 119Hz below 500Hz, while 763Hz is further away at 263Hz. Therefore, 381Hz was chosen.
H-Bridges
There are two H-bridges on the TS-8820. They are both driven as PWMs. The tsctl mappings associate "HB1" with the DIO for HB_OUT1 (with HB_OUT2 being the auxiliary pin), and "HB2" associates with the DIO for HB_OUT3 (with HB_OUT4 being the auxiliary pin). Therefore, controlling them is pretty much the same as controlling the other PWMs. The only exception is that an HBridge provides additional functionality of direction, since it consists of two outputs instead of one. There are four different states the H-Bridge can be in:
- HB_LEFT, in which the PWM drives a positive voltage on the primary pin associated with the H-Bridge with respect to the auxiliary pin.
- HB_RIGHT, in which the PWM drives a positive voltage on the secondary pin associated with the H-Bridge with respect to the primary pin.
- HB_FREE_RUNNING, in which no voltage in applied across either pin, effectively disconnecting them from the circuit
- HB_BRAKING in which both pins are connected to the same rail.
The TS-8820 does not support the HB_BRAKING state.
In the following example, we set the H-Bridge mode for H-Bridge 1 to HB_LEFT:
tsctl> EDIO HBridge 8820_HB1 HB_LEFT
1
Isolated CAN Port
There is an isolated CAN port which can be tested via the tsctl CAN commands.
Relays
There are four relays on the board. These are controlled as regular DIO. Note: There is a known issue in mappings for base boards which prevents the automatic association of names such as "RELAY1" with the correct DIO number. The issue is that such an association currently must be relative to the base board. However, the relays on the TS-8820 are driven by DIOs on the CPU board. We hope to fix this bug in the future. In the mean time it is necessary to use the connector names (or corresponding numbers) below: for RELAY1 use CN1_77 for RELAY2 use CN1_79 for RELAY3 use CN1_81 for RELAY4 use CN1_85
First, enter DIO SetAsync onto the command stack:
tsctl> DIO SetAsync
After each of the following outputs, a relay will click. The first four will be ON clicks, the last four will be OFF clicks.
tsctl DIO SetAsync> CN1_77 HIGH
tsctl DIO SetAsync> CN1_79 HIGH
tsctl DIO SetAsync> CN1_81 HIGH
tsctl DIO SetAsync> CN1_85 HIGH
tsctl DIO SetAsync> CN1_77 LOW
tsctl DIO SetAsync> CN1_79 LOW
tsctl DIO SetAsync> CN1_81 LOW
tsctl DIO SetAsync> CN1_85 LOW
LEDS
There are 27 LEDs on the TS-8820. Of these LED5 through LED28 can be controlled as DIO through their respective names as LEDs. For example, the following command will turn off LED17 if it is not already on:
tsctl DIO SetAsync> LED17 LOW
However, if you have followed the steps in this guide from a board powered up with default software, you may notice that the LED was on but did not go off. This is because LED17 corresponds to digital output 1 (OUT1) which we previous set to PWM mode:
tsctl DIO SetAsync>
tsctl DIO>
tsctl> Pin ModeGet LED17
MODE_PWM
tsctl> Pin ModeSet LED17 MODE_DIO
Now the LED should go off. Let's try to control LED9.
tsctl> DIO SetAsync LED9 HIGH
tsctl> DIO GetAsync LED9
INPUT_LOW
LED9 corresponds to digital input 1, so we cannot drive it high.


